
blog

Some Light on the Matter
May 20, 2011
Peeling back the layers of our significantly altered kitchen, unearthed just one original feature that had actually survived intact - the 4 inch wide, clear pine, strip floor. We found it covered by unfinished pine boards. Removing these knotty planks early in the process was a bit of a nightmare as they were fastened with large, copper, ring-shank nails. We had to knock off the heads of these hard gripping buggers, pry the boards up, wiggle and break off the stem, then set the remaining nail with a wallop.
Though not our preferred floor, these extra wide boards would prove useful; with their 7/8ths thick dimension, they were perfect for recreating baseboard and trim. Once they were off - their nails laid to rest - more difficulty ensued. The original floor was once covered with composition tiles laid down with a tarry glue. In a closet upstairs we found a box of 12' x 12's (complete with receipt), that matched an old photograph of the kitchen floor. They were purchased in the 1950s by way of the Sears catalogue.
The tiles were long gone, but there adhesive stubbornly remained. Little by little over several winters (whenever I had a minute), I took a heat gun and scraper to the floor. The laborious task of removing the gooey black substance brought to light an unpainted center with a light grey, roughly painted, 16 inch wide perimeter. This was a clear indication that there was once a linoleum rug (common in the 1930s).
We also noticed notches in the floor where the door casing had been. An L shaped molding called 'back band,' seemed the likely culprit. It was often used in those days to dress up trim and is still readily available. We chose to wrap our new doorways and windows with this finishing detail and were later given several old photographs of the original kitchen that verified our decision. As each piece went up the old cook space began to take on a distinctive 1930s appearance.
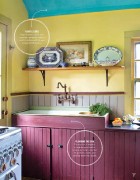
We painted the whole room (walls, ceiling and trim) Putnum Ivory, a warm beige color that relates to the original yellow hue while evoking the aged look of an off-white oil that has darkened over time. Once the final coat had dried, we could reinstall our lighting.
Gathering period fixtures appropriate to an old kitchen was an ongoing process. We kept our eyes peeled for bargains at yard sales, antique shops and salvage. We decided on a single sconce with a down-pointing glass shade to complement the sink and a pair of art deco inspired wall mounted fixtures (bare bulb), to illuminate the countertop. These matching porcelain (clamshell) sconces flank the picture window and were mounted in line with the brown counter outlets below.
The overhead light was a magic moment. One day while visiting our neighbor, we leaned back to admire her overhead light. Installed in the 1950s, it had a chrome canopy with a patterned glass shade. We liked it generally but thought that something in porcelain would be more appropriate for our 30s era kitchen. The very next day at a local antique shop - I rounded a corner and there it sat on a table - only $20 to boot. The glass resembled a faceted diamond and it had the porcelain canopy. A little cleaning and rewiring was all that was needed to ready this pretty jewel for its new role as a ceiling centerpiece.
The light over the kitchen table was another matter all together. I had something particular in mind; a nickel plated pendant (with a Bakelite switch), hung with an off-white cloth covered cord from a porcelain ceiling canopy. You rarely see them in antique shops or salvage because the cloth cord gets brittle after a hundred years and is generally not up to code. I already had an antique green enamel porcelain shade; all we needed was the right light. Reproduction was our best option. We purchased a brand new fixture (the only one in our home) from period lighting specialists, Rejuvenation. Though not a great deal of money (about $115), the "Skidmore" still cost more than all of the antique lighting in the rest of our home - combined.
(click photo to view larger image)

|

|

|

|
(comments = 1)
I like your approach and way of you thinking, it is really unique and also awesome.
So beautiful and awesome images you have .
leave a comment

fineartistmade blog
A journal about home design, gardening, art & all things Maine. Read more...
- July 2025
- June 2025
- December 2022
- November 2022
- October 2022
- November 2021
- May 2020
- October 2019
- August 2019
- July 2019
- September 2018
- April 2018
- December 2017
- August 2017
- June 2017
- May 2017
- December 2016
- August 2016
- July 2016
- April 2016
- November 2015
- June 2015
- May 2015
- March 2015
- October 2014
- March 2014
- February 2014
- January 2014
- December 2013
- November 2013
- July 2013
- May 2013
- April 2013
- March 2013
- January 2013
- December 2012
- November 2012
- August 2012
- June 2012
- April 2012
- March 2012
- February 2012
- January 2012
- December 2011
- October 2011
- August 2011
- July 2011
- June 2011
- May 2011
- April 2011
- March 2011
- February 2011
- January 2011
- December 2010
- November 2010
- October 2010
- September 2010
- August 2010
- July 2010
- June 2010
- May 2010
- My Scandinavian Home
- Daytonian in Manhattan
- {frolic!}
- I Married An Irish Farmer
- Smitten Kitchen
- The Curated House
- even*cleveland
- Mary Swenson | a scrapbook
- Ill Seen, Ill Said
- Gross & Daley Photography
- Remodelista
- Abby Goes Design Scouting
- Mint
- the marion house book
- 3191 Miles Apart
- Svatava
- Katy Elliott
- Poppytalk
- Kiosk
- decor8
- KBCULTURE
- Lari Washburn

_001.jpg)


